 Korean Lost Ark · Community Guide Translation
Guardian Knight — 333 “Red Wing” (Conflagration) Build Guide
Direct translation. No commentary or extrapolation added. This is a fan-made build guide, not an official onstove notice.

Contents
- Red Wing Conflagration — build introduction
- Engravings
- Ark Grid
- Ark Passive
- Skill Tree
- Skill Cycle
Build Introduction — The Incarnation-Form Guardian Knight
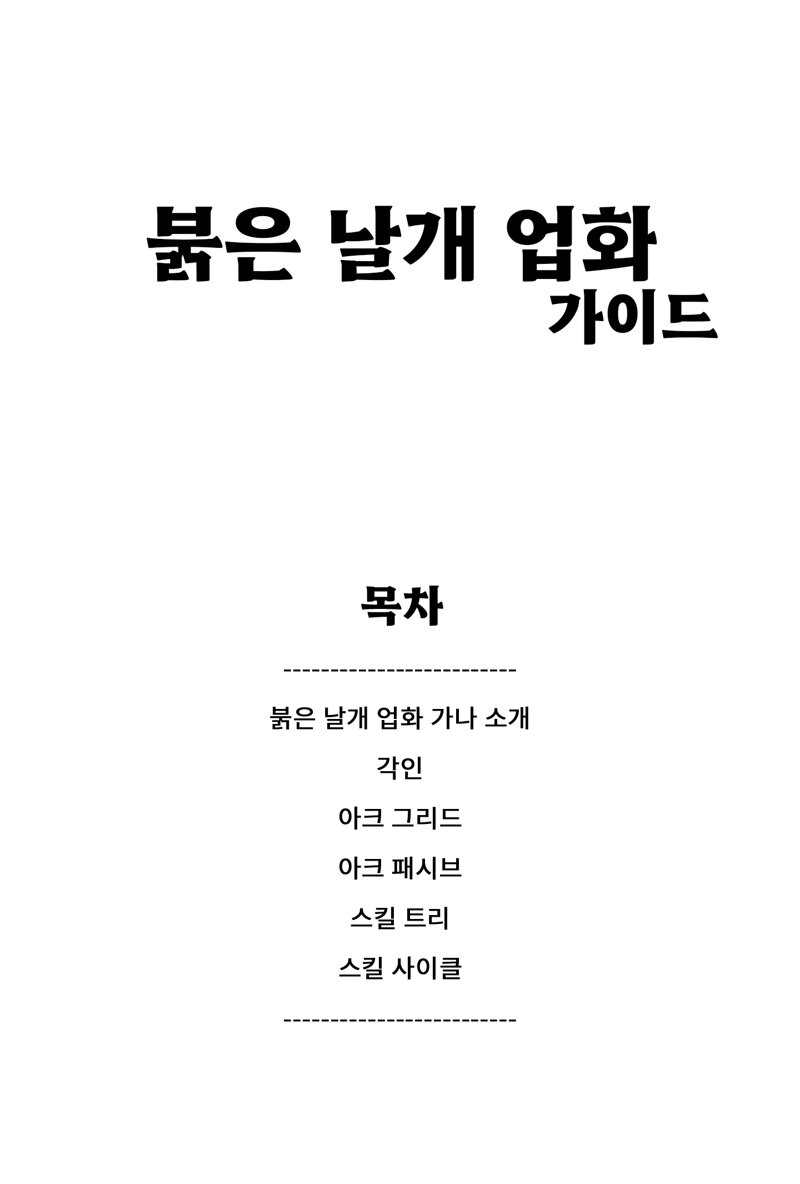
Translation of the cover / table-of-contents image:
Red Wing Conflagration Guide
Contents
- Red Wing Conflagration build — introduction
- Engravings
- Ark Grid
- Ark Passive
- Skill Tree
- Skill Cycle
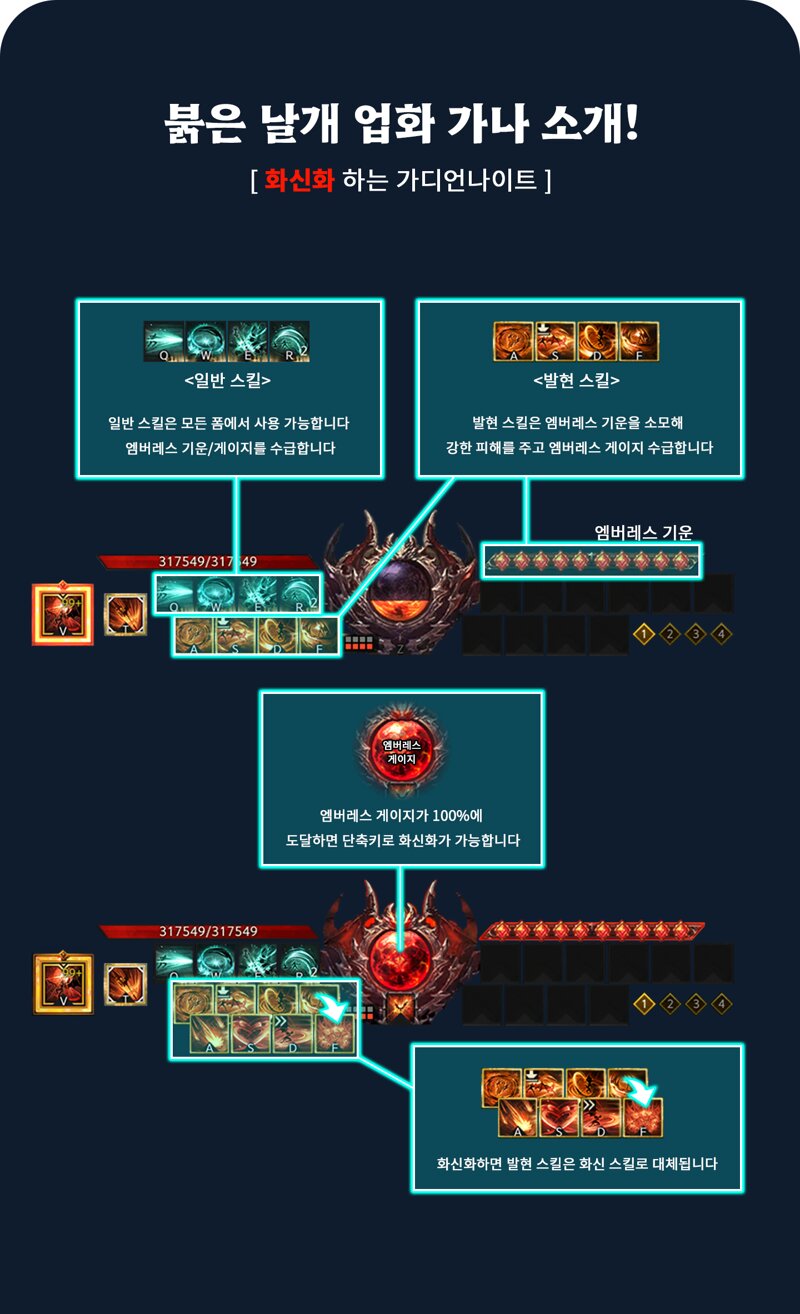
Translation of the build-mechanics intro image:
Red Wing Conflagration — Build Introduction!
[ The Incarnation-transforming Guardian Knight ]
- Normal Skills — Normal skills can be used in any form. They generate Emberless energy / gauge.
- Manifestation Skills — Manifestation skills consume Emberless energy to deal heavy damage and generate Emberless gauge.
- Emberless energy — the resource stacks shown on the bar.
- Emberless gauge — When the Emberless gauge reaches 100%, you can transform (Invoke Incarnation) with a hotkey.
- Upon transforming into Incarnation, the Manifestation skills are replaced by Incarnation skills.
Engravings
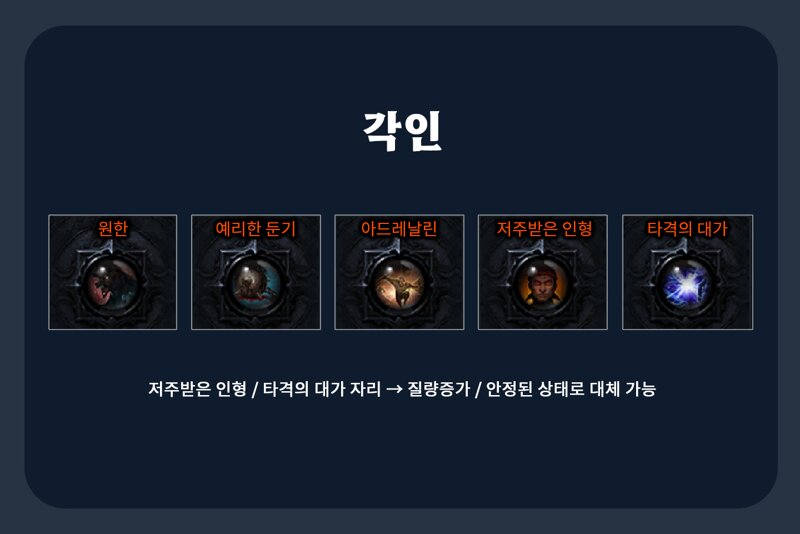
Translation of the engravings image:
- Grudge
- Keen Blunt Weapon
- Adrenaline
- Cursed Doll
- Hit Master
The Cursed Doll / Hit Master slots can be replaced with Mass Increase / Stabilized Status.
Ark Grid
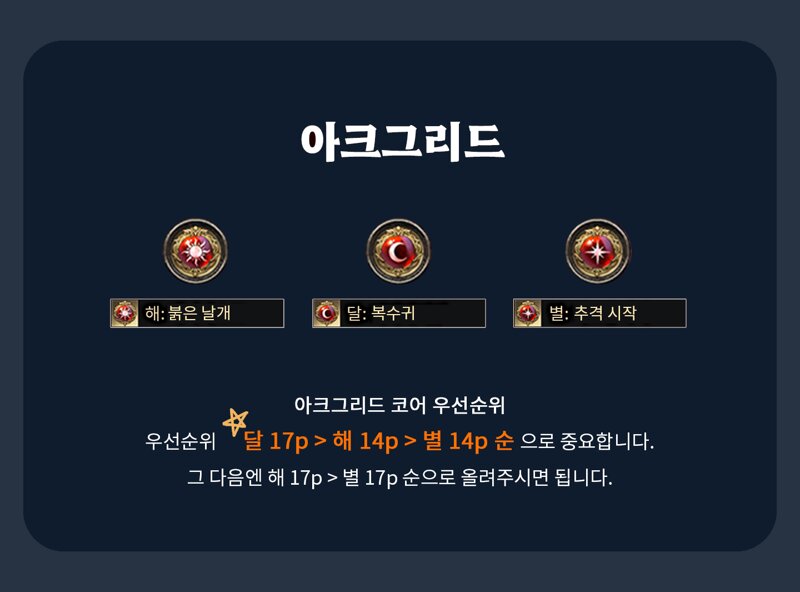
Translation of the Ark Grid image:
- Sun core: Red Wing
- Moon core: Vengeful Spirit
- Star core: Onset of Pursuit
Ark Grid core priority
Moon 17p > Sun 14p > Star 14p
After that, raise them in the order Sun 17p > Star 17p.
Ark Passive
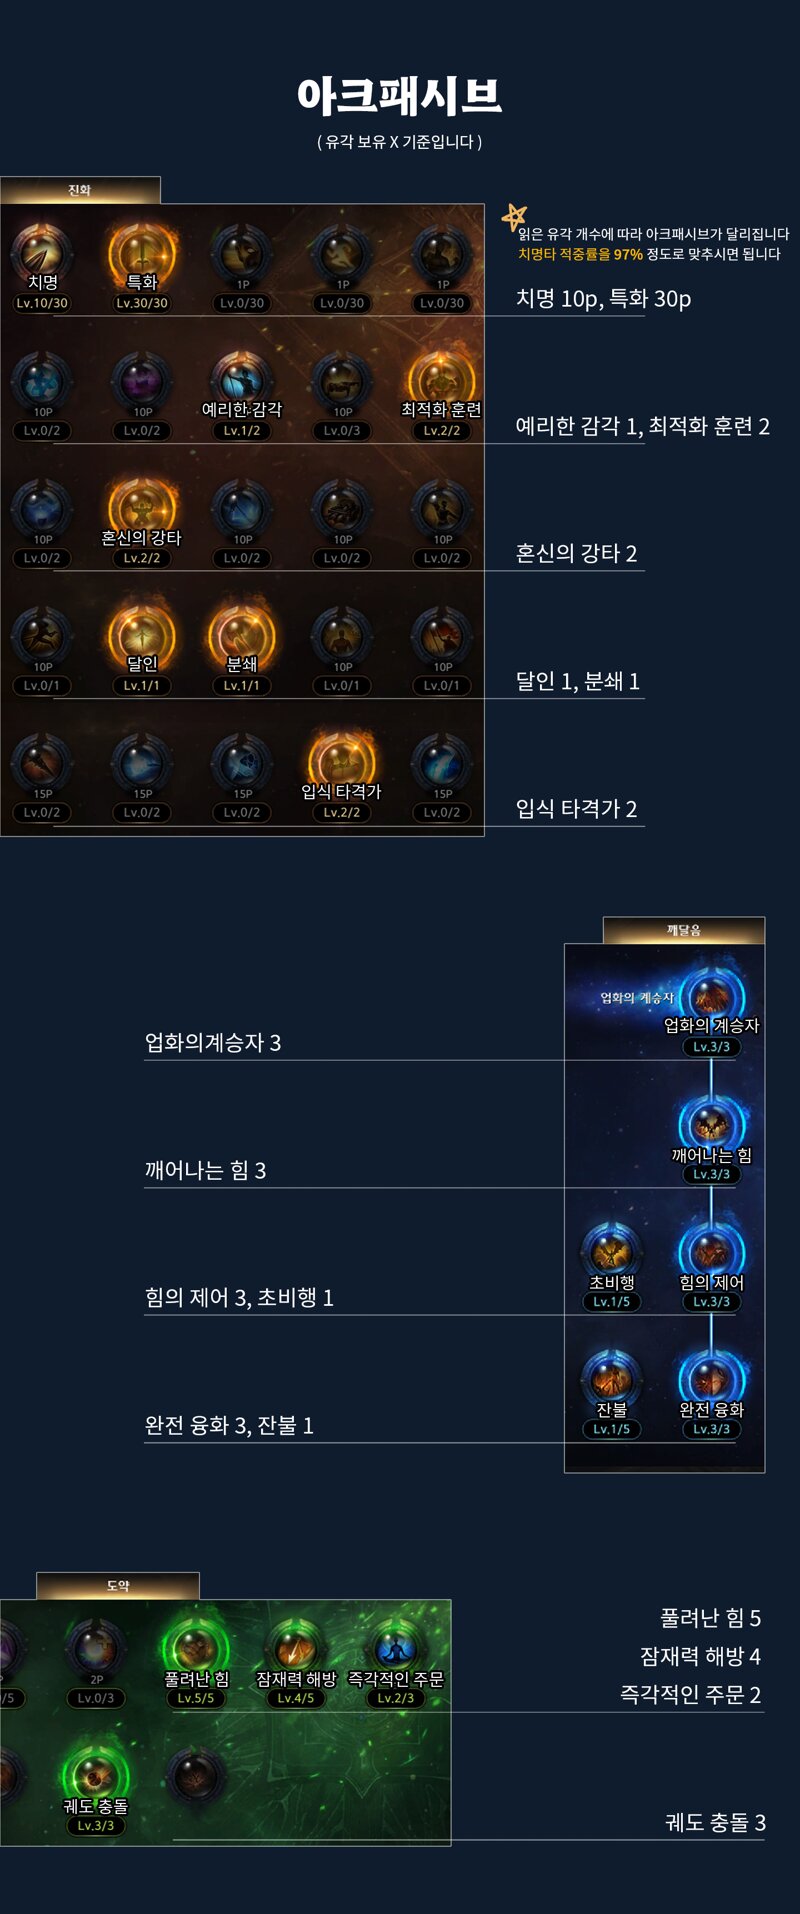
Translation of the Ark Passive image (based on not holding crit-rate relic sources):
The Ark Passive shifts depending on how many bright crit-rate sources you have. Aim for roughly 97% Critical Hit Rate.
Evolution
- Crit 10p, Specialization 30p
- Keen Sense 1, Optimized Training 2
- All-Out Strike 2
- Master 1, Crush 1
- Standing Striker 2
Enlightenment
- Heir of Conflagration 3
- Awakening Power 3
- Power Control 3, Super Flight 1
- Complete Fusion 3, Embers 1
Leap
- Unleashed Power 5
- Potential Release 4
- Instant Cast 2
- Orbital Collision 3
Skill Tree
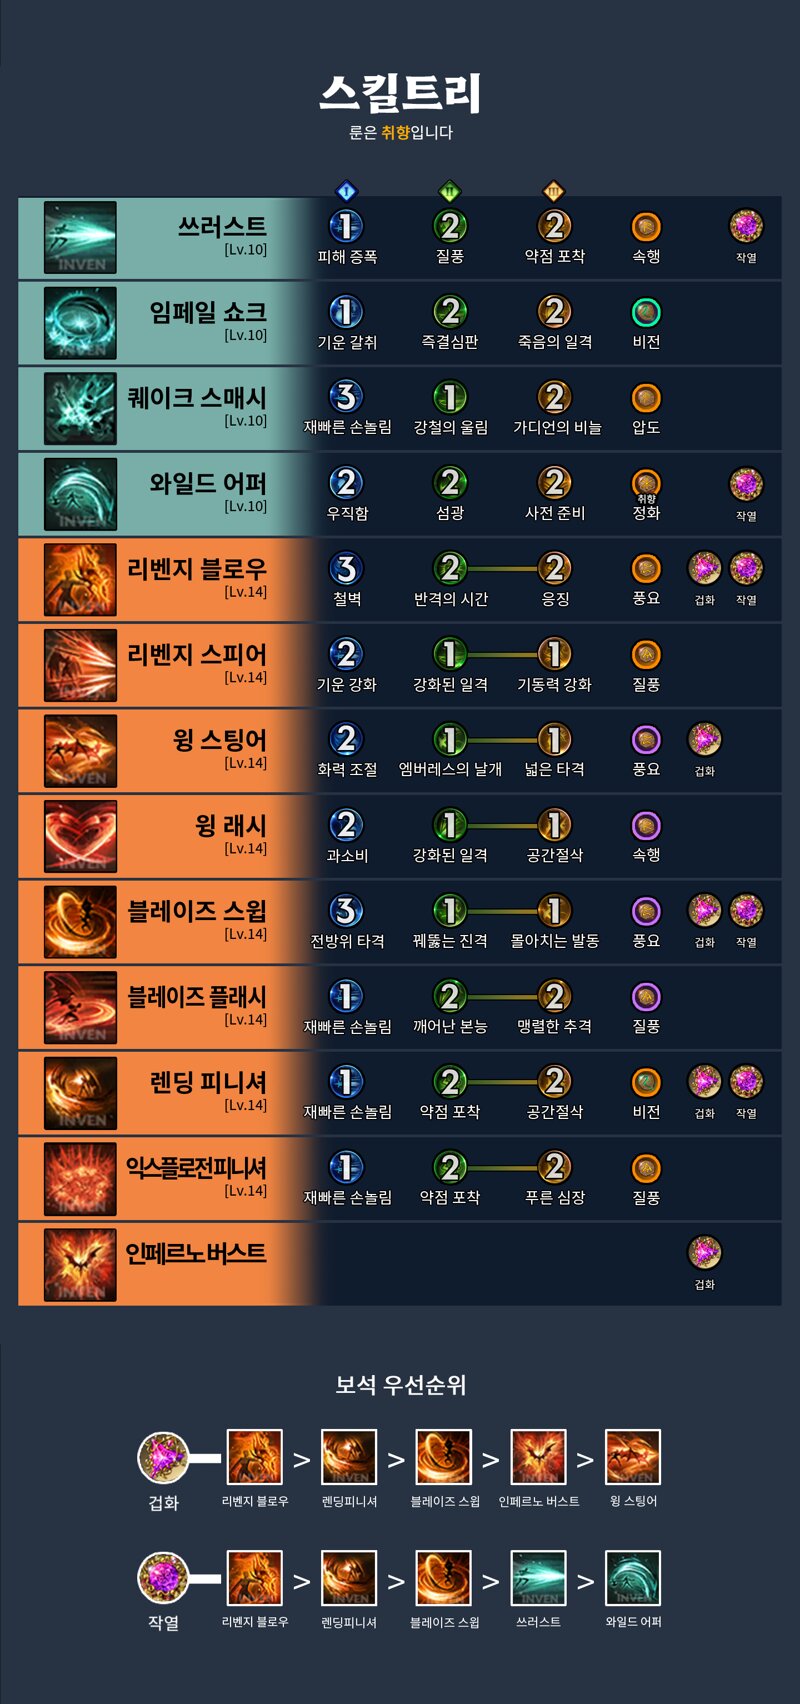
Runes are personal preference. Tripod columns are listed Tier 1 / Tier 2 / Tier 3; the number is the selected tripod’s point level.
Translation of the skill-tree image:
| Skill | Lv. | Tier 1 | Tier 2 | Tier 3 | Rune |
|---|---|---|---|---|---|
| Thrust | 10 | Damage Amplification (1) | Gale (2) | Weak Point Detection (2) | Galewind |
| Piercing Shock | 10 | Energy Detection (2) | Swift Judgment (2) | Death Blow (2) | Magick |
| Quake Smash | 10 | Quick Hands (3) | Echo of Steel (2) | Guardian’s Hold (2) | Overwhelm |
| Wild Uppercut | 10 | Steadfastness (2) | Flash (2) | Preparation (2) | Cleansing |
| Vengeful Blow | 14 | Iron Wall (3) | Counterattack Window (2) | Retribution (2) | Wealth |
| Avenging Spear | 14 | Energy Enhancement (2) | Enhanced Blow (1) | Pillar Enhancement (1) | Gale |
| Soaring Strike | 14 | Firepower Control (2) | Wings of Emberless (2) | Wide Strike (2) | Wealth |
| Wing Lash | 14 | Overconsumption (2) | Enhanced Blow (2) | Spatial Annihilation (2) | Galewind |
| Blaze Sweep | 14 | Omnidirectional Strike (2) | Piercing Charge (2) | Surging Activation (2) | Wealth |
| Blazing Flash | 14 | Quick Hands (1) | Awakening Instinct (2) | Fierce Pursuit (2) | Gale |
| Rending Finisher | 14 | Quick Hands (2) | Weak Point Detection (2) | Spatial Annihilation (2) | Magick |
| Exploding Finisher | 14 | Quick Hands (2) | Weak Point Detection (2) | Blue Heart (2) | Gale |
| Inferno Burst | — | (Awakening skill) | — | ||
Gem Priority
Conflagration (damage): Vengeful Blow > Rending Finisher > Blaze Sweep > Inferno Burst > Soaring Strike
Scorching (cooldown): Vengeful Blow > Rending Finisher > Blazing Flash > Thrust > Wild Uppercut
Skill Cycle
Skill sequences are listed in cast order. Z is the form / Incarnation hotkey.
0. Encounter Cycle
(In midair) Vengeful Blow → Vengeful Blow > Thrust → Wild Uppercut → Blaze Sweep → Soaring Strike → Piercing Shock → Rending Finisher → Wild Uppercut → Vengeful Blow > Z
▶ Demo: youtu.be/qzbfYxApPd8
1. Human Form
Thrust → Wild Uppercut → Blaze Sweep → Vengeful Blow → Piercing Shock → Rending Finisher → Wild Uppercut → Soaring Strike → Thrust → Vengeful Blow > Z
▶ Demo: youtu.be/NqVeO3vjZW8
2-1. Incarnation Form (with Super Awakening)
Deep Impact → Thrust → Exploding Finisher → Thrust → Avenging Spear → Piercing Shock → Blazing Flash → Wing Lash → Inferno Burst → Wild Uppercut → Thrust → Blazing Flash → Wing Lash > Z
2-2. Incarnation Form (without Super Awakening)
Exploding Finisher → Thrust → Avenging Spear → Piercing Shock → Blazing Flash → Wing Lash → Inferno Burst → Wild Uppercut → Thrust → Blazing Flash → Wing Lash > Z
▶ Incarnation demos: youtu.be/HGVJSod4xlY · youtu.be/IMcCy6bwG80
Skill Codes
Standard:
High-ceiling (4×Galewind):
▶ High-ceiling demo: youtu.be/70iX7zpt-4I
Strengths & Weaknesses of 333 Red Wing Conflagration
Strengths
- 1. Unrivaled stability. Even if main-damage skills like Rending Finisher and Blaze Sweep miss, gauge generation is strong, so the chance of the cycle dragging out is low.
- 2. Flexible contingency response. You can keep Quake Smash — useful for executing mechanics — available at all times, giving excellent ability to react to unexpected situations.
Weaknesses
- 1. Cerca free-for-all (대난투). Because Avenging Spear is enhanced only once per Incarnation entry, in segments that lean on cooldown reduction — such as the Cerca free-for-all — efficiency is relatively lower.
Q&A
Q1. Among the 111, 222, and 333 setups, which is the strongest?
On paper, 111 has the highest ceiling.
Q2. Why don’t you use Avenging Spear — the #1 damage-share skill — first?
Avenging Spear is enhanced only once per Incarnation. So if you use it first, the cycle gets pushed back and DPS drops.
Q3. Do I have to go full Specialization? Can I mix in Swiftness?
The highest ceiling is Specialization + Crit + Crush + 3×Galewind, but you don’t strictly need full Specialization. If full Specialization feels sluggish, a Specialization-Swiftness + Master setup gives similar multipliers by Lumekill (DPS-meter) standards. In sustained-DPS measurement environments like Trixion, Swiftness is fairly efficient, so investing in Swiftness up to the point of minimal cooldown waste in actual play isn’t a bad choice.
Q4. The skill code differs slightly from the guide, and one Scorching gem is missing!
It seems it was omitted while making the guide — sorry. The remaining Scorching gem goes on Piercing Shock. The guide used Piercing Shock at level 10, but pick whichever of level 7 / level 10 suits your style. Personally I prefer Piercing Shock level 7 for its wider range.
Q5. Can I push the ceiling even higher?
This guide prioritizes feel and stability. If you chase the ceiling, adopt Omnidirectional Strike and choose Quake Smash’s Conflagration tripod + Weak Point Detection for a slight ceiling increase. Personally I recommend Quake Smash Conflagration + Weak Point Detection.
(Video: Iron Wall + Quake Conflagration + Weak Point Detection + 3×Galewind — youtu.be/HGVJSod4xlY)
Closing
This guide went through several weeks of live (raid) testing to minimize risk. I optimized and organized the skill tree / tripod composition and skill cycle so that it’s both practical and easy for beginners to follow. Thank you.
Translation Notes
Class, skill, and term choices, with the KR original for cross-reference. Guardian Knight is a KR-only class; skill names use the official in-client English localization where one exists.
- 가디언나이트 (드레드) → Guardian Knight (Dreadful Roar) — the KR-only class; “Dread / 드드” is the community name for its Dreadful Roar build.
- 붉은 날개 업화 → Red Wing Conflagration — the build name; “Red Wing” is the Sun-core Ark Grid option, “업화” (Conflagration) is the Ark Passive theme.
- 가나 소개 → build introduction — “가나” reads as community shorthand (roughly “the ABCs / basics”) for an introductory walk-through.
- 화신화 → Invoke Incarnation / 화신 폼 → Incarnation Form / 인간 폼 → Human Form — in-client skill name for the transformation is “Invoke Incarnation.”
- 발현 스킬 → Manifestation Skills; 엠버레스 기운 / 게이지 → Emberless energy / gauge — the class’s identity resource (transliteration of “Emberless”).
- 초각 (초각성기) → Super Awakening — the cycle splits by whether the Super Awakening (Deep Impact) is available.
- Skills (official EN): 쓰러스트 → Thrust · 임페일 쇼크 → Piercing Shock · 퀘이크 스매시 → Quake Smash · 와일드 어퍼 → Wild Uppercut · 리벤지 블로우 → Vengeful Blow · 리벤지 스피어 → Avenging Spear · 윙 스팅어 → Soaring Strike · 윙 래시 → Wing Lash · 블레이즈 스윕 → Blaze Sweep · 블레이즈 플래시 → Blazing Flash · 렌딩 피니셔 → Rending Finisher · 익스플로전 피니셔 → Exploding Finisher · 인페르노 버스트 → Inferno Burst · 4933 → Deep Impact.
- Engravings: 원한 → Grudge · 예리한 둔기 → Keen Blunt Weapon · 아드레날린 → Adrenaline · 저주받은 인형 → Cursed Doll · 타격의 대가 → Hit Master · 질량증가 → Mass Increase · 안정된 상태 → Stabilized Status.
- 해 / 달 / 별 → Sun / Moon / Star Ark Grid cores. 복수귀 → Vengeful Spirit, 추격 시작 → Onset of Pursuit — descriptive translations; Guardian Knight Ark Grid options are not yet in the Western client.
- 겁화 → Conflagration (damage gem), 작열 → Scorching (cooldown gem) — the Tier-4 gem types; English names are tentative pending Western-client release.
- 특치 → (full) Specialization; 특치신 → Specialization-Swiftness hybrid; 신속 → Swiftness; 회심 → Crit (Ark Passive); 분쇄 → Crush; 속행/3속행 → Galewind / 3×Galewind (the cooldown rune).
- 트리시온 → Trixion (the training room); 루메킬 → Lumekill (a DPS-meter / benchmark reference).
- 세르카 대난투 → Cerca free-for-all — a raid segment (“대난투” = a brawl / free-for-all phase) where heavy cooldown-reduction is leveraged.
- 유각 → crit-rate relic source — the Ark Passive note ties the crit allocation to how many such sources you hold; aim for ~97% crit rate.